
Chapter 1
Intoduction
Thank you for choosing ezPayPal. You will find it easy to setup and use. The initial setup is so simple and intuitive that you may be able to start earning revenue in a matter of minutes without even having to read this manual. You will find all the advanced features and options of ezPayPal documented in this manual.What is it?
ezPayPal is a package to turn your website into an automated e-shop to sell your digital goods (such as eBooks, photos, programs etc.) It uses PayPal Instant Payment Notification (IPN) to automate everything from payments from your customers to product delivery. Aiming at simplicity and robustness, ezPayPal does all the heavy lifting invovled in IPN posting, verification, product and payment validation, buyer download link generation, email etc., so that your e-shop can run unattended for months, generating revnue. As a payment solution, ezPayPal finds itself in between PayPal buy-now buttons and shopping carts.
Why not use PayPal buttons?
PayPal "Buy Now" buttons are great if you sell a couple of eBooks or photos or programs a week. Yu get the payment and either email the product or manually create a download link for your buyer. Clearly, it is not a scalable solution. For one thing, all your payment and delivery information is in your email account, and your product definitions are on PayPal site. They should all be in a database under your control. Besides, once your products become popular, you will be spending an inordinate amount oftime servicing orders. If you want to add more products, you will have to generate new buttons and cut and paste the HTML code to your web pages.
With ezPayPal, you will add a new product using a dedicated web interface. The moment it is defined your new product will appear on yopur website ready to be bought by your customers. All the payment and customer data will be sotred so that you can have detailed reports, start your own affiliate networks, or link exchange systems etc. Infinitely more powerful, yet simpler than buttons.
Why not use a shopping cart?
I found shopping carts too cumbersome both for my customers and for my backend administration purposes. My customers typically wantto purchase and download one copy of a program or an eBook of mine with no fuss. Having them go through multiple screens of registration, login etc. before they can get to the payment gateway is suboptimal in the context of downloadable digital goods. The overall user experience needs to be as close to the one-click buy a la Apple App Store as possible. Hence ezPayPal.
In addition to the unweildy user-experience, the backend administration (product setup, customer and payment management etc.) in shopping carts is also heavy-handed for the purpose of digital goods sales. Combined with their typically high price range, the administrative costs render the shopping carts unsuitable for me. ezPayPal, on the other hand, is designed spcifically for downloadable digital goods, and provides a streamlined experience for your buyers and your admin staff. But, if your inventory includes physical goods, ezPayPal may not be the right solution for you.
Different Versions and Features
ezPayPalcomes in two stand-alone versions, Standard (also known as Lite) and Pro. It also comes as a WordPress plugin, again in Standard and Pro versions.Standard Features
- Minimal setup and administration load: ezPayPal gets you started with your online shop within minutes, rather than hours and days.
- Generous help and hints during setup: Whenever you need help, the information and hint is only a click away. (In fact, only a mouseover away.)
- Automatic validation of admin and setup entries to minimize errors: ezPayPal catches all the usual data entry errors so that you can afford to be a bit sloppy.
- Very little programming knowledge required: This program is written for creative people who have some digital products to sell. So it doesn't call for any deep computing knowledge. The most you will have to do is perhaps to set permission to a couple of folders.
- Handles all the complex PayPal instant notification and data transfer to prevent unauthorized access.
- Buyers are automatically redirected to a download page.
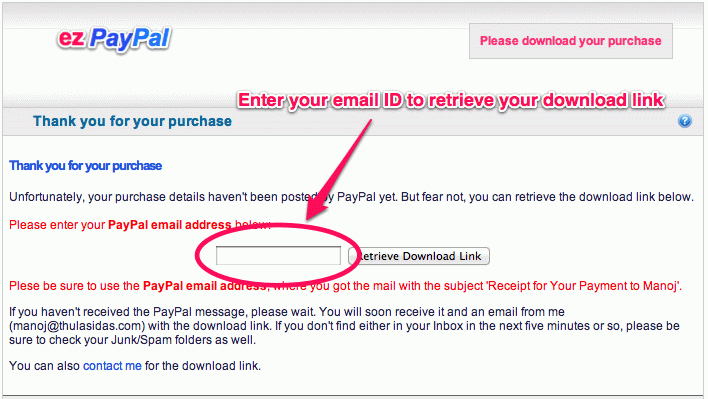
- Self-service download link retrieval: If the PayPal information is not yet received by your server, your buyer will see a page where he can retrieve his purchase link. (This feature reduced my support load by 90%).
- In addition to the download page, an automated email with the download link is sent to your buyer as well. Just in case...
- Easy to add new products to your inventory.
- Automatic generation of an online shop. Once the first product is added, you can already see it on your online shop.
ezPayPal is available as a freely distributed WordPress plugin as well as a standalone package.
Security Features
Since ezPayPal deals with money, it takes the security and integrity of your data very seriously. It also puts serious roadblocks to prevent unauthorized access to your server.
- All login type actions are implemented in such a way as to virtually eliminate the possibility of SQL injection attacks.
- The
setup.php(which you are advised to remove after successful installation) script doesn't let you set up your installation twice. In fact, it won't even display the setup information the second time you run it. Reinstallation will require database manipulation. - Only one admin user is permitted. You cannot add another admin user.
- There is no interface to recover your password once you install your system. No amount of database hacking will recover it. So please be careful to note it down in some secure location.
- Strong validation of all user entries exposed to the world.
Pro Features
In addition to the fully functional Lite version, there is a Pro Stand-Alone Version with many more features. The WordPress plugin is also available in the Pro Plugin Version.
If the following features are important to you, consider buying the Pro version.
- Data Security: The Pro version takes special measures to set up data verification links to ensure your sales data is safe and not susceptible to corruption. In technical terms, it checks for the existence of InnoDB in your MySQL installation, and uses it if found, setting up foreign keys to ensure referential integrity, and indices to guarantee performance. The Lite version uses the default MyISAM engine, fast and simple, but not exactly secure.
- Sandbox Mode: In the Pro version, you have the option to choose PayPal sandbox mode so that you can check your setup before going live.
- HTML Emails: In the Pro version, you can send impressive HTML email to your customers rather than the boring plain text messages.
- Template Editor: The email body, thank you page and download display are all editable in the Pro version.
- Automatic handling of refunds and disputes. When you issue a refund on the PayPal website, the corresponding sale in your database will be set to inactive. And if a buyer registers a dispute, he (and you) will get a friendly email message stating that the dispute is being reviewed and handled.
- E-Check handling. The Pro version recognizes e-check payments and sends a mail to the buyer regarding the delay for the check clearance.
- Sales Editor: You can load a single sale or a bunch of sales on to a friendly interface and change their data. For instance, it will let you change the download expiry date and resend a download notification message -- one of the frequent support requests from the buyers.
- Email Tools: You can select a number of your buyers to notify, for example, of a critical update of your products, or of a free upgrade opportunity.
- Product Version Support: The Pro version supports versioning of your products. It will keep track of the version sold to your buyers and your current versions. So, if you want to send a product and version specific upgrade notice, you can do it with Pro version.
- Batch Upload: The Pro version gives an easy way to upload your product files (when you release new versions, for instance), and keeps track of their versions.
- Additional Tools: The Pro version also gives you a bunch of tools (php example files) that can help you migrate your existing sales data or product definitions.
- Data Migration: Using this Pro tool, your database tables can be automatically upgraded to the later version without losing your sales info and other settings.
- DB Backup: The Pro version has an option to generate a backup of your sales info to download to a safe location.
- DB Restore: It also provides a means to restore (of course) a previously backed up data file, overwriting (or appending to, as you wish) the existing sales info. (WIP)
- Security Audit: The Pro version provides you with a tool to check your settings and installation for possible security issues.
- Product Updates: Your customers can initiate product update checks. If the version they purchased is older than the current version on your shop, they can download the latest version. Bu default, the first update is provided free of cost, and the subsequent ones are chargeable at $0.95. In later versions, this update policy will be configurable on a product-by-product basis.
- Upgradeable Products: You can define products that are upgradeable. For instance, you can sell a short eBook at an introductory price. If your buyer likes it, he has the option of buying the full book by paying the difference. (WIP)
If you buy the Pro version, you will get an upgrade notice (using the last item listed above) when the features that are Work-in-Progress are completed. You will be able to update free of charge.
Optional Packages
ezPayPal is designed to be extensible. Already in the pipeline are the following optional extensions:
- ezAffiliates: Create your own affiliate network and go viral by turing your satisfied customers into your advertising affiliatees. This package, built on the pubicly available Affiliates-for-All, integrates perfectly with to automate affiliate sales tracking and commission computation and more.
- ezReports: Maximize your sales by analyzing your sales. This reporting package makes slicing and dicing your sales and affiliate data a snap, so that you can spot opportunities.
- ezTextLinks: Do you have a high page-rank site? Do you get a lot of requests for text links? They can be significantly more lucrative (by a factor of 100, in my case) than contextual ads such as AdSense. The returns can be even greater if you can deal with your advertisers directly, rather than via providers like Text Link Ads that take 50% of your revenue. ezTextLinks will handle payment, activate and expire links, send reminder emails and handle renewals etc.
- ezSupport: Every complex software project, once deployed, generates significant support load. Most of the support questions are frivilous, where the end-user presents silly issues that are easily resolved by a cursory look at the documentation. How do we ask the end-user to RTFM without antagonizing them? I found that it could be done by switching to a paid support model. I started charging 95 cents per support questions, and my support load went down by two orders o magnitude. This ezSupport package is built on the excellent osTicket program. It works hand in hand with ezPayPal and provides you with a configurable support system.
- PageSales: Another project built on ezPayPal is a WordPress plugin to sell your blog pages in nicely fromatted printable PDF files. Page Sales, when priced right, can be a perfect way for your appreciative readers to send you donations.
Note that these extensions are designed to work with Standalone Pro version. They will be ported to the Plugin Pro version as well if possible.
Support and Product Updates
ezPayPalcomes with extensive documentation both on its website and as a part of the distribution. The documentation is also available as a PDF file. But the design of ezPayPal is to make it so intuitive that you will seldom need to refer to the documentation. To this end, the documentation is actually integrated with the ezPayPal interface at two levels.
Timely Help: On all setup, admin and Pro screens in ezPayPal, you can hover over theicon next to a feature or option to bring up a tooltip with detailed information about feature or option under consideration so that you don't have to refer to this manual every time you need help. ezPayPal will also validate your inputs and present warnings or error messages to guide you along.
To get the help page specific to an ezPayPal screen you are working with, look for the
Despite this large documentation effort, if you still find yourself needing support, we have a paid support model. Please visit our Support Portal and raise a ticket.
ezPayPal and other programs sold at our e-shop can be updated by visiting our Update Portal. This portal will list the updates available to you and let you download or purchase them. The first update for each of the programs is provided free of cost, and the subsequent ones are charged a nominal $0.95.
Chapter 2
Installtion
ezPayPal is a database program written in PHP. It requires PHP and mySQL on your webserver. Don't worry, most webservers do. If you run WordPress or any other kind of blog or content management system on your server, you have what it takes to run ezPayPal. Please have the database connection details handy so that you can complete ezPayPalsetup.
Timely Help: On all setup, admin and Pro screens in ezPayPal, you can hover over theTo get the help page specific to an ezPayPal screen you are working with, look for the
Wordpress Versions
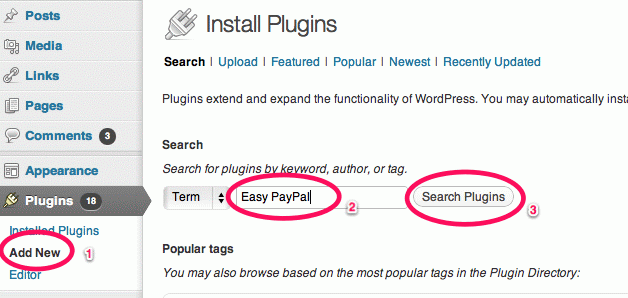
The standard plugin version can be downloaded and installed from within the admin interface of your blog. Search for Easy PayPal and hit "Install Now."
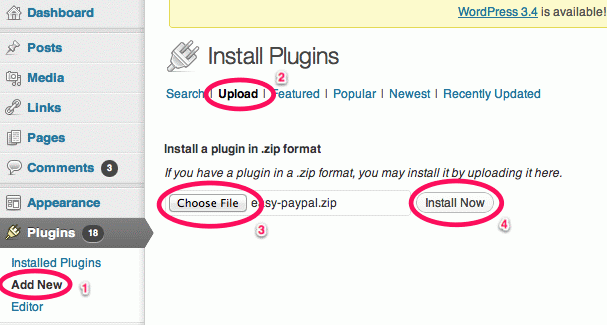
You can use your blog admin interface to install the Pro version of the plugin as well. Use the Upload page to locate and install the downloaded zip archive.
Congratulations! Your installation is now complete.
Standalone Versions
Unlike the WordPress version, the standalone version needs to know your database connection details. It also needs you to set up an admin user name and password for security. In the WordPress version, these entities are already defined in your blog, and ezPayPal reusese them.
- Unzip and upload the downloaded package (
ezpapal.ziporezpaypal-pro.zip) to your sever. - Browse to the location using your web browser.
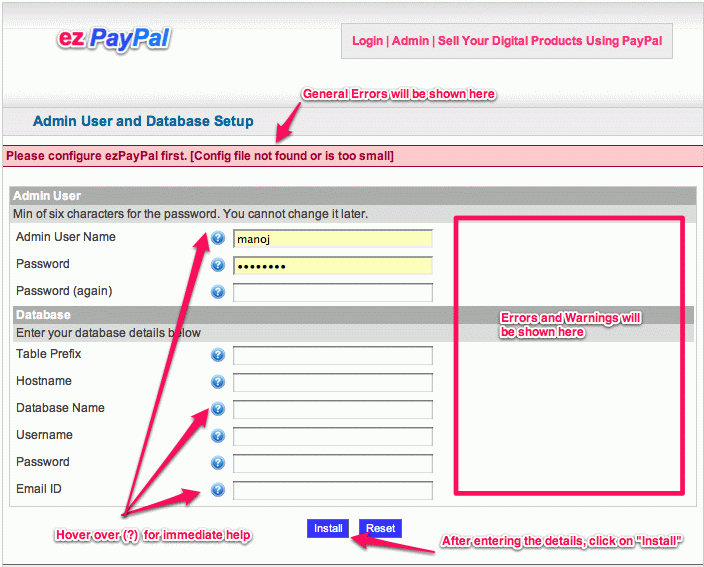
- Choose a admin user name and a strong password, and enter your
database connection details. The setup page will generate the
configuration file. Your ezPayPal is now fully set up. You will
get the following message indicating the successful installation.

- If there are errors in creating the configuration file, you will get
detailed instructions as to how to correct the issue. Just follow the
instructions to complete the installation.

- If you have misconfigured ezPayPal, you will have to remove
the configuration file (
rm ezppCfg.php) and recreate it following the instructions in the previous step. ezPayPal intentionally makes it difficult to recover from errors because error recovery interfaces are also security holes.
Here are the descriptions of the various fields on the installation
screen. In keeping with the ezPayPal philosophy of providing help
where it most matters, these descriptions are available to you on the
installation screen itself, by hovering over the icon next to the field.
- Admin User Name: Use an alphanumeric string as the username, with the first character a letter. Best not to use names like admin, root, staff or your name -- these can be easily guessed.
- Password: Use a password that cannot be easily guessed. Be sure to note it down or keep it some secure password keeper program. ezPayPal takes security very seriously and you will not be able to retrieve the password or reinstall the package without some serious work. You are not allowed to change Admin password, although you can create a new Admin account.
- Password (again): Type in your password again for verification.
- Table Prefix: Use a prefix for all the database tables so
that you can easily identify them. The suggested prefix
ezpp_is a decent one, but to enhance your security, you may want to choose a different one. - Hostname: If your database is hosted on a different server,
please provide its name. Usually, MySQL databases are hosted at the same
server as your Webserver, in which case, you can use
localhostas your database server. - Database Name: If you are using a dedicated database created
using your CPanel or other hosting provider interface, please provide
its name. It usually has the form
username_dbname. If you have limits on the number of databases you can create on your server, you can reuse an existing database. If not, it is best to create a dedicated one for your PayPal activities. - Username: Your username to log on to the database server. It is typically the same as the database name itself.
- Password: Your database password.
- Email ID: Optional. This email ID will be used to send
Database error messages from your ezPayPal installation. If there are
errors during IPN transactions, ezPayPal sends messages to the support
email ID you have (or will) set up in
admin.php. However, if the DB cannot be connected to, the support email ID stored in the DB cannot be accessed, and diagnostic messages cannot be sent. So, this is the only email Id the program will have access to. If you do not want emails about DB errors, please give a fake email ID likenobody@nowhere.com
Important: Be careful about the admin username and password. Since ezPayPal takes security very seriously, it wouldn't let you retrieve a lost password. Resetting the password will require database operations.
Optional Addon Modules
ezPayPal is designed to be extensible. You can enhance the functionality of the Pro Standalone version by purchasing and installing optional modules. Their installation is even easier than the simple installation of ezPayPal described above. The array of modules available and under development are listed and described in greater detail in subsequent chapters.
Chapter 3
Administration
Once you complete the initial setup, you can access the admin page, where you specify your PayPal details, general options and define your digital products.
Timely Help: On all setup, admin and Pro screens in ezPayPal, you can hover over theTo get the help page specific to an ezPayPal screen you are working with, look for the
Note: The screenshots below are from the Pro version of ezPayPal. In the standard version, the Pro features and options will not be presented.
Once you have set up your ezPayPal, you can enter the admin area to configure it. You will need your admin credentials (that you set up during installation setup), your PayPal email address (so that your customers can pay you), and your database details (to save your potential purchases -- you may need to contact your web server admin for this information).
Entering the Admin Control Panel
WordPress Plugin Versions
To access the Admin Control Panel in your WordPress installation, log
on to your blog admin section (http://yourblog/wp-admin) and
click on "Easy PayPal Lite" or "Easy PayPal Pro" under your "Settings"
menu.

Standalone Versions
You can enter the admin screen by clicking Admin button right after installing ezPayPal.

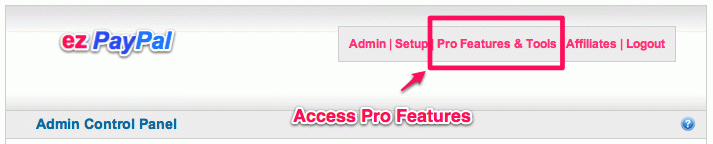
You can also find a link to the Admin page in all the pages presented by ezPayPal. Look for it in the right hand side top corner as shown below.

Once you enter the admin page, the first thing you will be asked to do is to authenticate yourself.
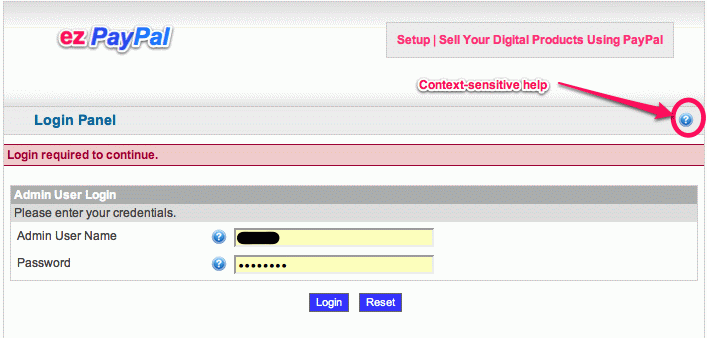
Warning: Please note down your Admin username and password. If you have forgotten either, there is no way to recover it. You will have to access your database and delete the table with a name likeezpp_5e81f9859d223ea420aca993c647b839M, where the part before the underscore is the database prefix you chose during installation, and the part after is a random string. After deleting this table, please go to the installation script (http://yoursite/setup.phpwhere yoursite is the location where you installedezPayPal.
Admin Sections
Regardless of whether you are using the standalone or the WordPress plugin version of ezPayPal, you will get an Admin Control Panel as the screenshots below. The Admin Control Panel has three sections, and we will discuss them separately below.
In the Pro versions, these three sections are arranged as tabs, with the Product Definition tab on top because we expect you to navigate to it most often after your ezPayPal is set up. Please access the sections described below by clicking on the corresponding tabs.
The screenshots shown are from the Pro version of ezPayPal. If you
have installed the Lite edition, you may see fewer option entries on this
screen. The easiest way to get information on a feature or option is to
hover over the icon next to it.
PayPal Details
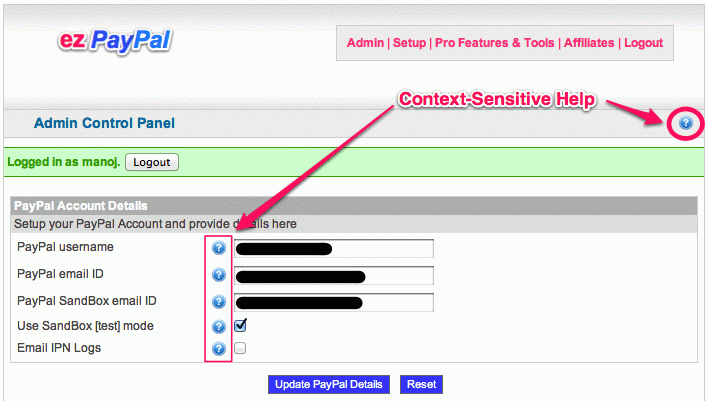
This section has the following fields.
- PayPal username: Enter your name (or your company name). This is used for display purposes.
- PayPal email ID: Enter your PayPal email ID, which will receive your payments.
- PayPal SandBox email ID: PayPal SandBox email ID, which you can use for testing your setup. This entry is optional.
- Use SandBox [test] mode: If checked, PayPal SandBox will be used.
- Email IPN Logs: If checked, the PayPal IPN details (logs of the conversations between your server and PayPal) will be emailed to the support email address even in live mode.
General Options
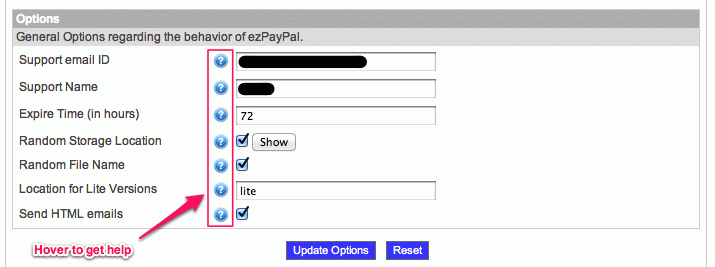
This section has the following fields.
- Support email ID: An email ID where your buyers can contact you for support.
- Support Name: A friendly name to go with your support email ID.
- Expire Time (in hours): The number of hours after which the download links will expire. When a purchase is made, an auto-generated email is sent to the buyer with a download link. The link expires after the number of hours you specify here. (I use 72 hours).
- Random Storage Location: Randomize the storage location of your digital goods so that potential hackers cannot easily guess it? Recommended. Note that you will have to set the permission to the storage directory so that files can be uploaded there.
- Random File Name: Randomize the file name of your digital goods on the server as you upload it so that potential hackers cannot easily guess it? Recommended.
- Location for Lite Versions: Optional. If you plan to provide
Lite versions of your products, here is where they will reside.
Give the full pathname on the server, or a relative pathname under the
ezPayPalfolder. - Location for Pro Versions: If you plan to use non-random
location for the Pro versions of your products, here is where
they will reside. Note that non-random location is not recommended
because it can be easily guessed and hacked into.
Give the full pathname on the server, or a relative pathname under theezPayPalfolder. - Send HTML emails: If checked, the emails sent your buyers with their download links will be in HTML format. You can customize the default HTML template with the Template editor, which you will find under Pro Tools.
Product Definitions
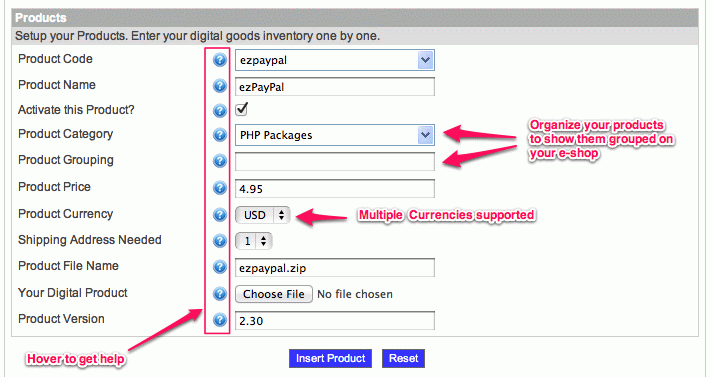
Here is where you define your digital products. This section has the following fields.
- Product Code: A short code for the digital product you want to sell. e.g., ezPro. This key field needs to be unique. The drop-down menu is editable. (To add a new product, just type in a new Product Code. To edit an existing one, either select it from the menu or type it in.)
- Product Name: A descriptive name of the digital product you want to sell. e.g., Easy AdSense Pro - Premium AdSense Plugin for WordPress bloggers
- Activate this Product?: Leave this option checked to list the product in your shop. Unchecking it is equivalent to deleting the product. It will not be listed, nor can it be bought.
- Product Category: An optional category for the product, which you can use for grouping similar products together. You can have categories like Apps, Plugins, eBooks, Photos, Songs etc. (The drop-down menu is editable. To add a new category, just type in a new name. To edit an existing one, either select it from the menu or type it in.)
- Product Grouping: An optional grouping for your products, this field can contain higher level groupins, like Software (for Apps, Plugins, for instance), Creative (e.g. for eBooks, Photos) and so on. This field can help you organize or autogenerate your e-shop pages as your business grows. (The drop-down menu is editable. To add a new grouping, just type in a new name. To edit an existing one, either select it from the menu or type it in.)
- Product Price: Enter only numbers. e.g. 4.95
- Product Currency: Specify the currency in which the product price is give. e.g. USD.
-
Shipping Address Needed: Specify whether PayPal will ask for a
shipping address for this product:
- Prompt for (but not require) an address
- Do not prompt for an address
- Prompt for an address, and require one
- Product File Name: When your customers buy your digital product, this is the file they will download.
- Your Digital Product: This is the actual digital product that you want to put up for sale using ezPayPal. It can be a zip archive, photos, PDF files etc. If you have multiple files making up the product, please make a zip archive of it first. Note that the file you upload does not need to have the same name you specify as Product File Name. The real file will be saved on your server under a random file name in a random location so that it will not be easily discovered by potential hackers.
- Product Version: Your sales will keep track of the product versions so that you can, for example, send upgrade notifications to your buyers. You would use the Email Tools (found under Pro Tools) for this purpose. Use a numeric version with two decimals (like 3.12 to indicate major version 3, minor version 1 and update 2, for instance). String versions (like V3.1.2) are not supported.
Once you have defined at least one product, your e-shop is already up
(in the standalone versions) at http://yoursite/ez-shop.php.
In WordPress plugin editions, you will use shortcodes to generate a shop
front or "Buy Now!" kind of links. See the chapter on
Your Shop for details.
Chapter 4
Your Shop
The moment you define your first product using the Admin Control Panel, it is ready for sale on your shop. This chapter describes the features of your shop and tells you how to link to it from other web pages of yours or your affiliates.
Note: The screenshots below are from the Pro version of ezPayPal. In the standard version, the Pro features and options will not be presented.
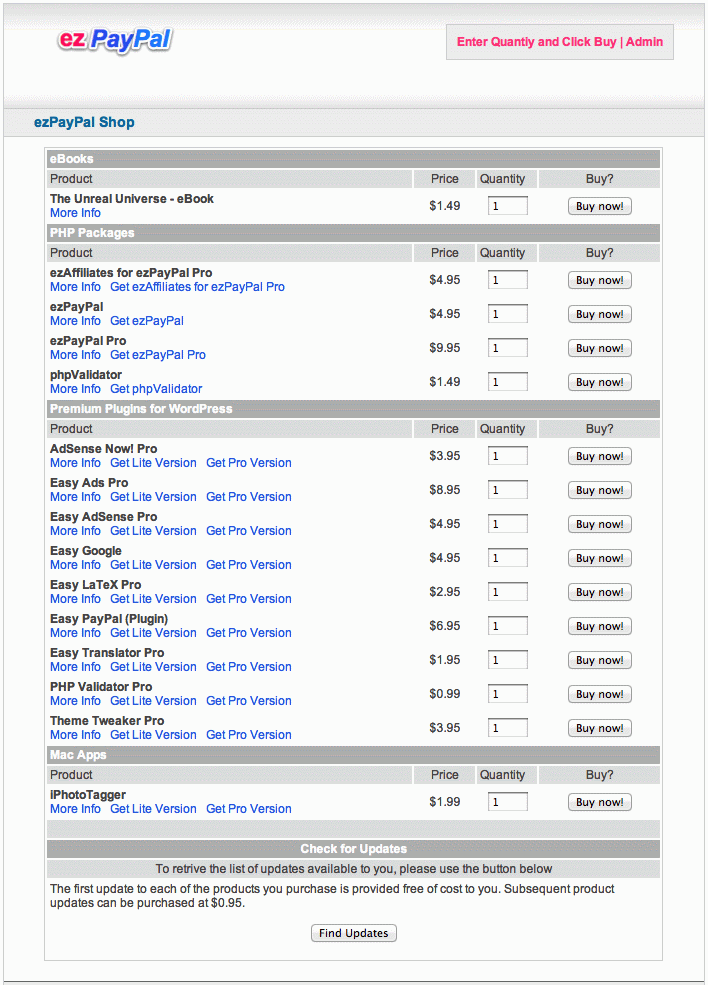
Basic Shop
Your shop front generated by ezPayPal is shown in the image below. You can access it by browsing to your installation in the standalone versions. In the WordPress plugin versions, you will use the so-called shortcodes to access the shop front, as described below.

Quick Start with WordPress Plugin Version
It is easy to get started with ezPayPal in this WordPress plugin version. Please follow the steps below.
- If you see any warning or error messages above in red, please take care of it first.
- Please set up your PayPal Details above.
- Set up your General Options above
- Add a product by providing its Product Definition and uploading it.
Please do not use spaces or special characters in your Product Codes. Use only letters, digits and underscore.
Valid product codes:abc_2345, ITEM02, a789, xyzetc.
Invalid product codes:abc 123, ITEM:02, a-789, x+y$zetc.
Once a product is added to your repository, your e-shop is ready to
be displayed on your blog. The display is controlled using WordPress
Short Codes. In order to show the whole shop, create a new page or
post with the short code [ezshop]. This will present your
whole e-shop in a neat tabular form within the page or post.
Note that by default, a page (not a post) with the slug
ez-shop (or ez-shop-n, where n
is a number like 1, 2, 3 etc.) is created for you. Please do not
delete this page even if you create other e-shop pages. This page is
used as the IPN listener, which will receive the messages from
PayPal. This page also serves as your digital goods delivery
portal. In other words, if you delete this page, your ezPayPale-shop may not work at all.
Note also that you have to use pretty permalinks for the auto-generated shop front to work. Take a look at the URL address of the shop front (in the address bar on your web browser). Does it say something like http://your.blog/?p=123? If so, go to your WordPress dashboard, Settings -> Permalinks and select any setting other than the (ugly) default one.
Each product can be displayed as a "Buy Now" kind of link with the
short code [ezshop buy='product_code']Buy this product
now![/ezshop]. This will insert a link, which when clicked, will
take your reader to a PayPal page to buy the product.
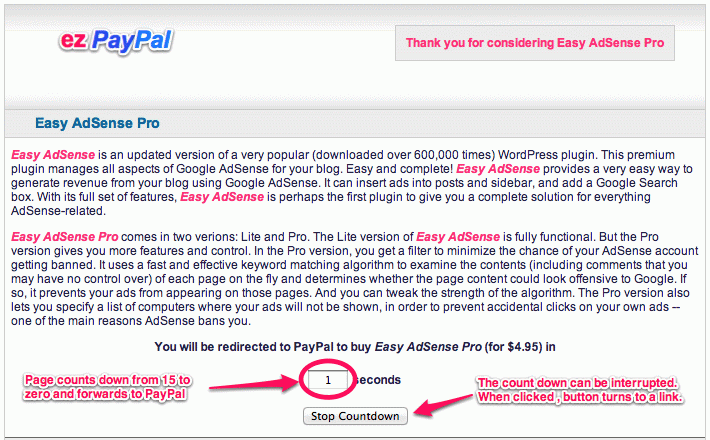
You can display your product links using [ezshop
show='product_code']View this product now![/ezshop]. It will
show page describing your product benefits, with a count-down timer
which will take your reader to PayPal in fifteen seconds.
In either buy=product_code or
show=product_code short codes, you can temporarily
suppress the link generation by specifying link='no',
(e.g., [ezshop show='product_code' link='no']View this product
now![/ezshop]). In this case, your whole e-shop will be
displayed as though you specified just [ezshop]. This
way, you can easily toggle between links and e-shop.
More Help
Help is always only a click or mouseover away. The full help on all the features of this plugin is included in your download. You can browse it or print it.Timely Help: On all setup, admin and Pro screens in ezPayPal, you can hover over theTo get the help page specific to an ezPayPal screen you are working with, look for the
Standalone Versions
In standalone verions, both the Pro and the Lite (also called the Standard) editions, you can access your e-shop by simply browsing to the location where you installed ezPayPal. If you are logged in, you will see the following screen, giving you all the actions you can take as the administrator.
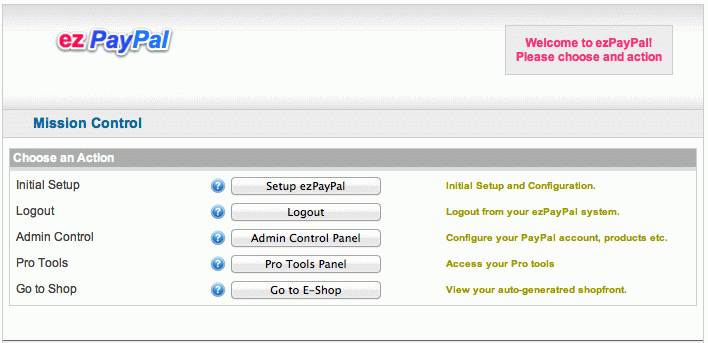
If you are not logged in to your ezPayPal, you will see your e-shop directly, which is the view your customers will be presented with. Note that even in this view, there is an easy access link to your admin page. Clicking on it, while not being logged in, will bring up a login request.
Buy and Show Links
Similar to the WordPress plugin version, the standalone version also
has the "Buy Now" and the count-down links. The format for a "Buy Now"
link would be http://yoursite/?buy=product_code, which takes
your customer directly to PayPal site. And
http://yoursite/?show=product_code takes them to a product
information page, which redirects to the PayPal payment page in 15
seconds. The customer can abort the count-down if they so choose.
Advanced Shop
The basic shop front generated by ezPayPal may not be fancy
enough for your purposes. It is possible to develop fancier presentations
of the shop front. In my own
e-shop, for instance, I make use of the product_meta
table to generate the following e-shop.
While this shop front may not look much fancier than the basic one,
note how products are grouped together based on their categories, and how
links to product description pages are presented. Furthermore, the product
information page (http://yoursite/?show=product_code) also
uses the information in the meta table as shown
below.
Customization
Setting up an advanced shop requires some PHP programming and database
manipulations. If you want to get it done by your in-house team, you can
start by making a copy of ez-shop.php, modifying the product
rendering part to make use your product_meta table, and then
point your website to use the modified version instead of the original
one.
I can help by providing the code that generates my own e-shop as an example. If you would like me to customize your shop front, get in touch with me through Support Portal.
Future Plans
I plan to make the customization process accessible to my end-users by
providing a template where they can define how their e-shop and product
information pages will look like. They will also have an interface where
they can add and modify their product_meta table.
Buyer Experience
To help your buyer during the purchase process, the following help text is shown to them when they click on the titlebar icon.
EZ Shop
Welcome to this e-Shop powered by ezPayPal. Buying a product featured here is as easy as entering the quantity desired and hitting the "Buy Now" button. On the next screen, we will redirect you to PayPal to complete the purchase. If the automatic redirect doesn't work, please hit the "Proceed to PayPal" button.
Once you complete the payment, PayPal will ask you to come back to this e-shop, if you so choose. Please choose to do so, and you will end up on a product delivery page where you can download your product. You will also receive an email with the download details.
Please note that the download liks are set to expire after a period of time. So please download your products promptly.
If you see you an option to update your product, this e-shop has implemented the advanced version tracking capabilities of ezPayPal, and you can claim your free product updates or purchase paid updates.
Enjoy the e-shop and your product purchase!
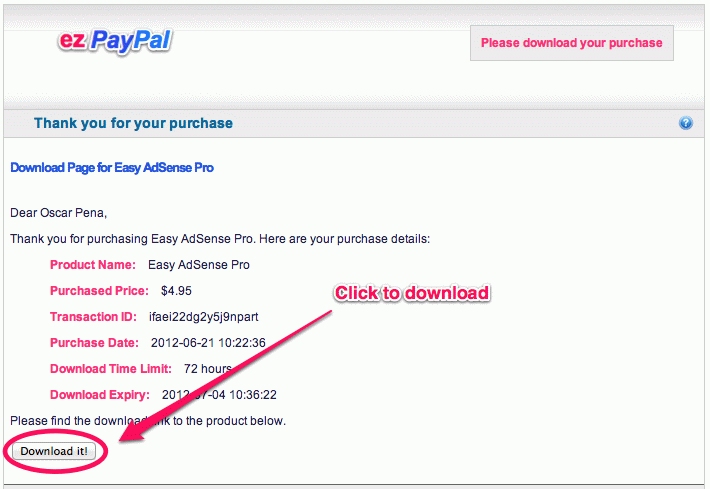
Similarly, during the product delivery stage, your buyer is guided along using the following help screen.Delivery of Your Purchase
Thank you for your purchase at this e-shop powered by ezPayPal. If the purchase has been successfully handled, you will see an obvious download link prominently displayed near the bottom of the page. Click on it to download your product.
If there has been a delay in handling the purchase information, you can still retrieve your download link by entering your email ID (please be sure to use the email ID you used for purchasing the product) in the text box.
Chapter 5
Pro Features and Tools
Accessing Pro Sections
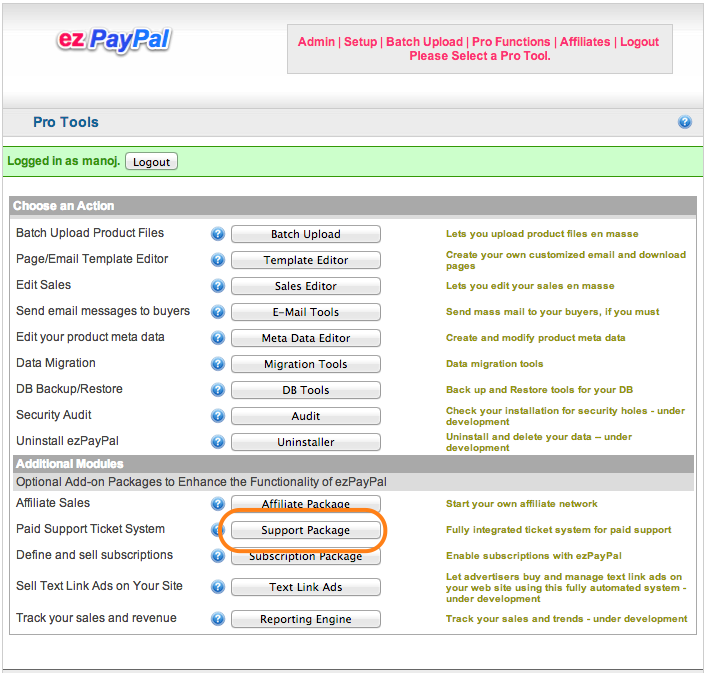
If you have the Pro version of ezPayPal, either the standalone version or the WordPress plugin version, you can access the Pro Features and Tools from any Admin page as shown below.
Note: If you are using the Lite version of ezPayPal, you will get a dialog inviting you to purchase the Pro version.
Timely Help: On all setup, admin and Pro screens in ezPayPal, you can hover over theTo get the help page specific to an ezPayPal screen you are working with, look for the
Overview of Pro Features
The Pro control panel looks like the figure below.
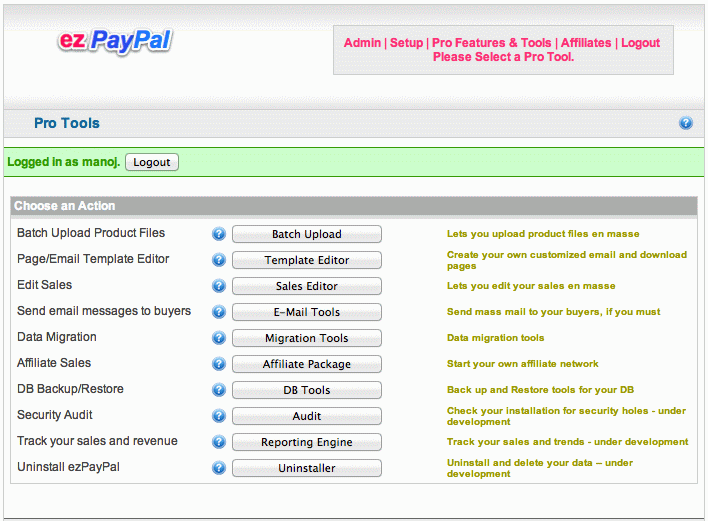
The following list gives you an overview of each of the features. The detailed descriptions follow.
- Batch Upload Product Files:
Upload your product files to a location on your server
(default:
../zips) and use this tool to copy them to the actual product file locations as specified in the product definitions in your database. - Page/Email Template Editor: Edit your Download Page and Email templates.
- Edit Sales: If you want to edit the details of a set of sales or an individual sale (to resend the download mail, for instance), use this tool.
- Send email messages to buyers: If you want to send email messages to your buyers (to inform them of a particular product update or critical fix, for example), you can use this tool to selectively send mail.
- Data Migration: Sample files to illustrate how to migrate your data from existing flat files or PHP config files to ezPayPal.
- DB Backup/Restore: Save your precious data from your database to your local computer or restore from a previous backup.
- Security Audit: Check your configuration for potential security holes. [Work in Progress]
- Uninstall ezPayPal: In the unlikely event that you want to get rid of ezPayPal, here is how to do it gracefully. [Work in Progress]
In addition to these Pro Tools, additional modules to enhance the functionality of ezPayPal can be purchased from our web store. Please refer to the chapter on Optional Modules for details.
Batch Upload
The batch upload facility copies your product files en-masse
from a staging area on your server to your ezPayPal product file
storage area, with the right randomized file names. This way, you don't
have to remember or look up the storage location (which has a
hard-to-remember randomized name) and the file names (again, random
strings, typically). All you do is to copy your product files to a staging
area (which defaults to zips under the ezPayPal installation folder), and launch the batch uploader.
Note that the staging area has to have the right kind of protection via
.htaccess or equivalent mechanism. The default area is
protected.
Upon launching the batch uploader, you get a simple window as shown below.

Ensure that the staging area on your server is correctly entered and hit the Submit button. You will get a screen similar to the following figure.
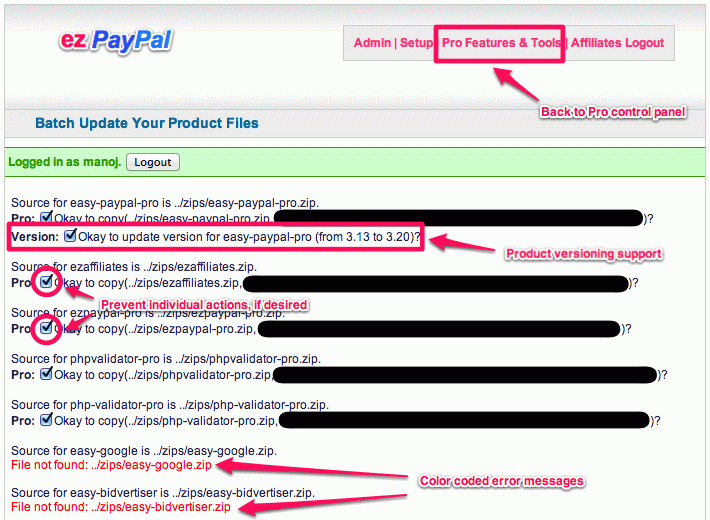
Note how the files missing in your staging area are highlighted in red error messages. And how you can prevent the batch uploader from taking a particular action by unchecking the appropriate checkbox.
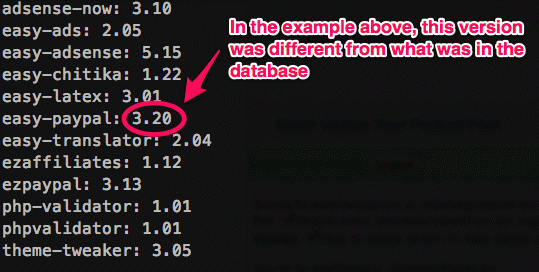
You can update your product versions as well, by specifying them in a
text file versions.txt in the staging area. The batch
uploader will read this file and offer to update the product versions, if
needed. The versions.txt file I used to create the screenshot
above is shown below.
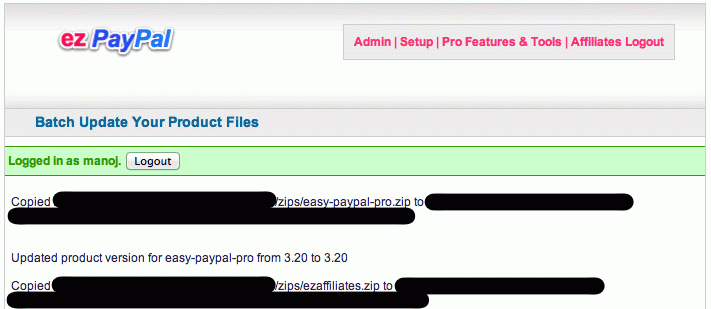
Once satisfied with the actions that the batch loader will carry out, hit the Submit button at the bottom of the screen (not shown in the screenshot above), and you will get a report of what has been done.
Template Editor
ezPayPal uses editable templates to generate emails and download pages. For instance, when your customer buys a product from your e-shop, he gets redirected to a download page after he makes the payment at PayPal. This download page is generated out of the "Download Page" template. The email your customer receives informing him of the purchase and giving him purchase details also is template-driven. The email uses three templates: "Email Subject", "Email Body" and "Email Body Html".
A large number of templates are included with your ezPayPal Pro purchase. The Template Editor tool helps you make modifications to them (or to add new ones for your own purpose).
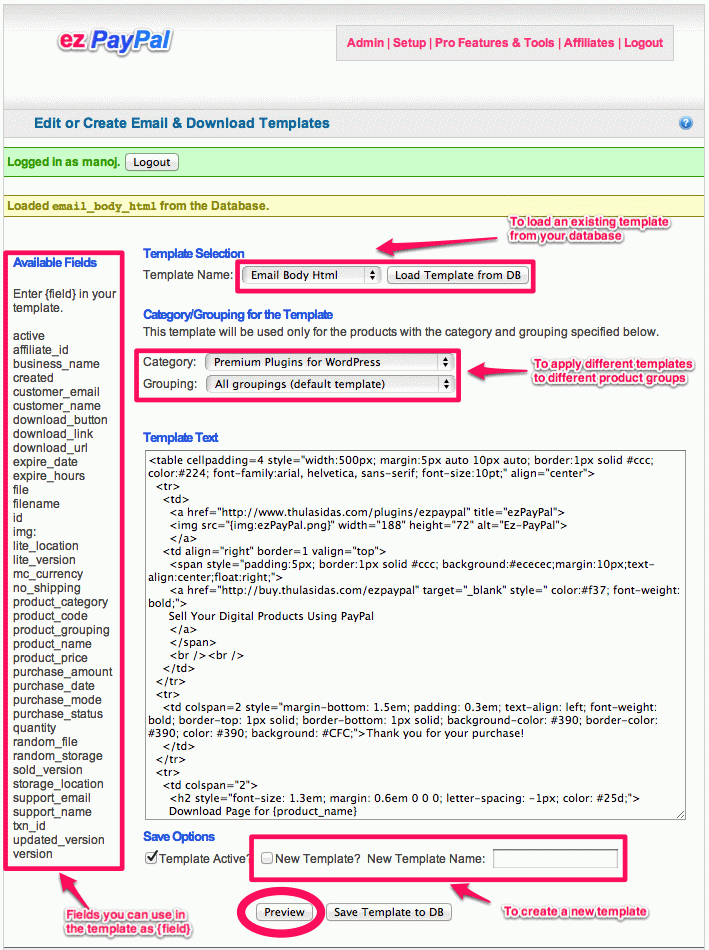
When you enter the Template Editor page by clicking on its button on the Pro Control Panel, you will get the screen shown below.

The various elements of this daunting interface are shown in the screenshot above. To edit an existing template, load it from your database using the drop-down menu titled "Template Selection." Once the template is loaded, you can make modifications to it. You can add or remove or modify various fields from the list of available fields. Please study the annotated screenshot for instructions.
List of Templates
In addition to the Download page template, ezPayPal has a few triplets of templates as you will see in the complete list of default templates below.| Template Name in DB | Display Name |
affiliate_body |
Affiliate Body |
affiliate_body_html |
Affiliate Body Html |
affiliate_subject |
Affiliate Subject |
dispute_body |
Dispute Body |
dispute_body_html |
Dispute Body Html |
dispute_subject |
Dispute Subject |
download_page |
Download Page |
echeck_body |
Echeck Body |
echeck_body_html |
Echeck Body Html |
echeck_subject |
Echeck Subject |
email_body |
Email Body |
email_body_html |
Email Body Html |
email_subject |
Email Subject |
refund_body |
Refund Body |
refund_body_html |
Refund Body Html |
refund_subject |
Refund Subject |
reversal_body |
Reversal Body |
reversal_body_html |
Reversal Body Html |
reversal_subject |
Reversal Subject |
update_body |
Update Body |
update_body_html |
Update Body Html |
update_subject |
Update Subject |
Using Templates
The triplets are used in various parts of the program. For instance,
the echeck triplet is used when your buyer pays using an
e-cheque, when PayPal recommends that you not send your product until the
check clears. Similarly, when a dispute is raised by your buyer,
ezPayPal uses the dispute triplet to send a friendly
mail to your buyer. The triplets can also be used to initiate mass mail to
a selected group of your customers from E-Mail
Tools -- another Pro tool.
Previewing and Saving
During your edits, you can also preview your edits using the "Preview" button. Once satisfied, you can save it your database using button near the bottom. You can also save the edited template under a new name by checking the appropriate button (refer to the screenshots above for details). For new templates, please follow the naming conventions for template triplets as in the list of templates above, so that the E-Mail Tools can find them.
Sales Editor
One of the major difficulties with most e-commerce packages is the near-impossibility of editing your transactions in any meaningful way. All you can do is to manipulate your database using some tool like phpMyAdmin. Since you may not know the data semantics that the developer had in mind, you are playing with fire when you edit the data directly. You may end up violating some referential constraint and make your program unusable.
Despite this danger, there are times when you have to do it. For instance, a particular sale may have expired before your buyer had a chance to download his product (which tends to happen quite often for me). You may want to reset the expiry of this particular sale so that the download link works again.
ezPayPal enables you to edit your transactions in a semantic-aware fashion (meaning, you won't irrevocably mess up the data while editing). The interface to do this is the Sales Editor.
Single Sale Editing
When you start up the Sales Editor by hitting appropriate button on the Pro Control Panel, you enter the Single Sale Editor mode. As the text in the interface says, if you want to quickly modify a single sale, and/or send a fresh download email to your buyer, you can use this section. First, load the single sale by providing either the email ID of the buyer or the PayPal transaction ID. If you provide the email ID, the latest sale by that buyer will be loaded. You can then change the expiry date (of the download link) below, if you like. If the expiry date is in the future, you will have the option to resend the email message with the download information to your buyer.
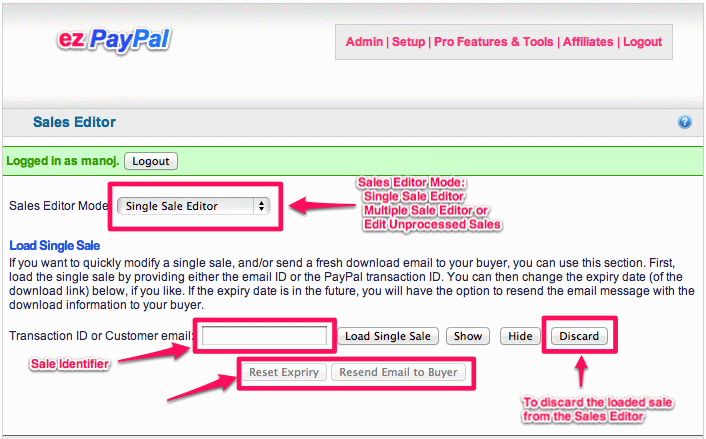
Once you load the sale, you can inspect it by clicking on the "Show" button, or discard it and start over by hitting the "Discard" button. Discarding means unloading the sale from the Sales Editor memory, not deleting it from your database. (In fact, there is no interface in ezPayPal that will let you delete critical information from the database. You will have to use other tools, like phpMyAdmin or a DB client, to do that.)
Note that the actions on Sales Editor (like resetting the expiry or sending email) will require further confirmation on a popup dialog box.
Bulk Editing Multiple Sales
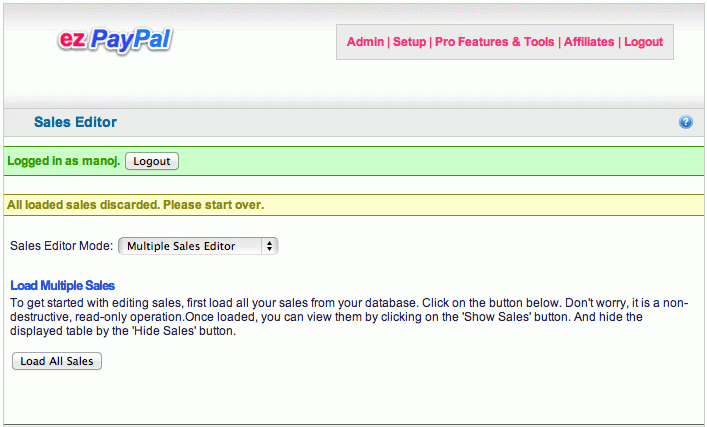
When you select the Multiple Sales Editor mode, you will get the window below. To get started with editing sales, first load all your sales from your database. Click on the button below. Don't worry, it is a non-destructive, read-only operation.Once loaded, you can view them by clicking on the 'Show Sales' button. And hide the displayed table by the 'Hide Sales' button.
Once the sales are loaded (which might take a few minutes if you have a lot of them in your database), you will get the following window. The window contains generous amount of help in terms of text, status messages and tooltips.
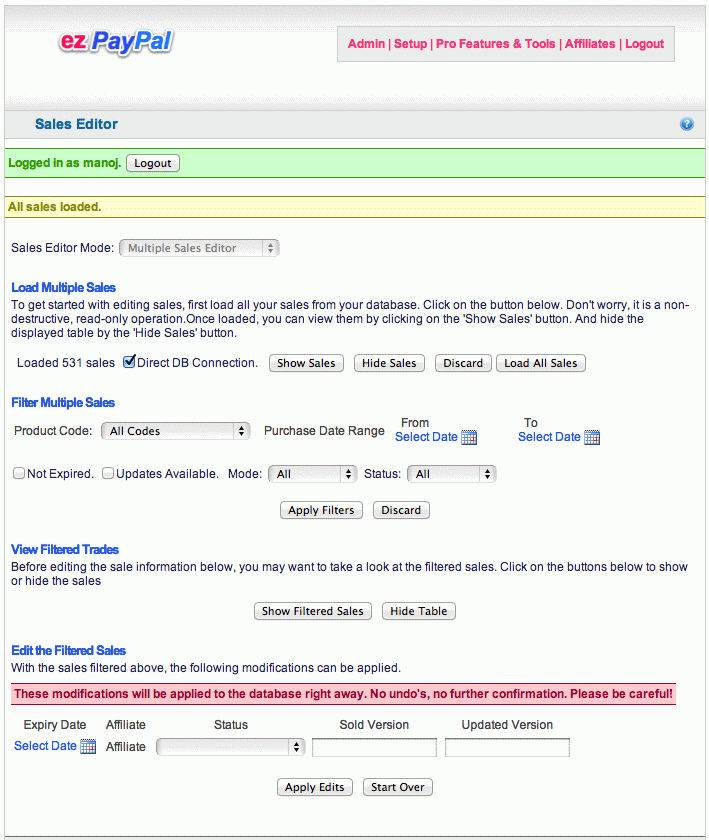
The top part of the screen shows the number of sales loaded, and gives you options to display them. The second part, titled "Filter Multiple Trades," lets you narrow the sales loaded in a variety of ways. Once the filtering is done, you can examine the selected sales. The last part of the window (titled "Edit the Filterd Sales") will let you set the expiry date, affiliate ID (if you want to manually track affiliate sales -- not fully implemented yet), the sale status (Refunded, Voided, Completed or Pending), the version sold to the buyer, and the current version of the product.
Despite the dire warning in red about the finality of the edits, your modifications are not actually applied in the current version. The code to do so is not hard to write, but such direct database manipulations have to be done with extreme care. After more tests, the code will be activated in a future version.
Editing Unprocessed Sales
Unprocessed sales are the ones where the communication between PayPal and ezPayPal was disrupted in some fashion. In order to understand it, you need to know how PayPal IPN works.
From PayPal site:
- PayPal sends your IPN listener a message that notifies you of the event
- Your listener sends the complete unaltered message back to PayPal; the message must contain the same fields in the same order and be encoded in the same way as the original message
- PayPal sends a single word back, which is either VERIFIED if the message originated with PayPal or INVALID if there is any discrepancy with what was originally sent
The network traffic can fail at any of these steps. Knowing this, ezPayPal plays it safe -- as soon as it receives the information from the first step, it saves the information into your database. If the communication or the processing fails during any subsequent steps, you can still recover from the error later on using this "Editing Unprocessed Sales" feature. The window you get when you choose this mode is shown below.
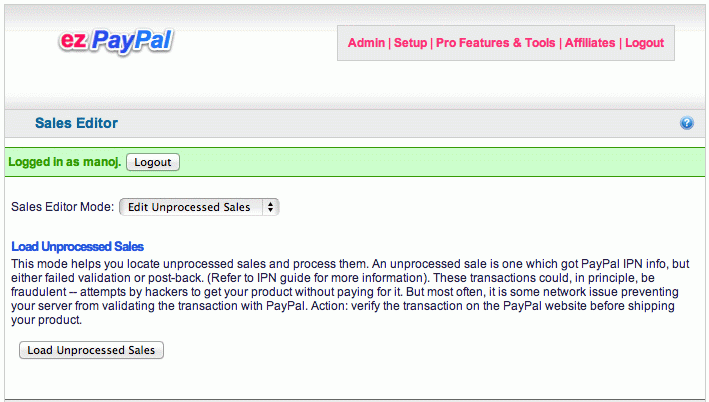
From the help text on the interfce: this mode helps you locate unprocessed sales and process them. An unprocessed sale is one which got PayPal IPN info, but either failed validation or post-back. (Refer to IPN guide for more information). These transactions could, in principle, be fraudulent -- attempts by hackers to get your product without paying for it. But most often, it is some network issue preventing your server from validating the transaction with PayPal. Action: verify the transaction on the PayPal website before shipping your product.
Once you load the unprocessed sales (by clicking on the button titled "Load Unprocessed Sales"), you get the following window. In order to display the unprocessed sales loaded, hit the "Show Filtered Sales" button. You can then process the individual sales by clicking on the "Process" button on the corresponding row. If you so choose, you can send the download email to the buyer while processing the sale by checking the option.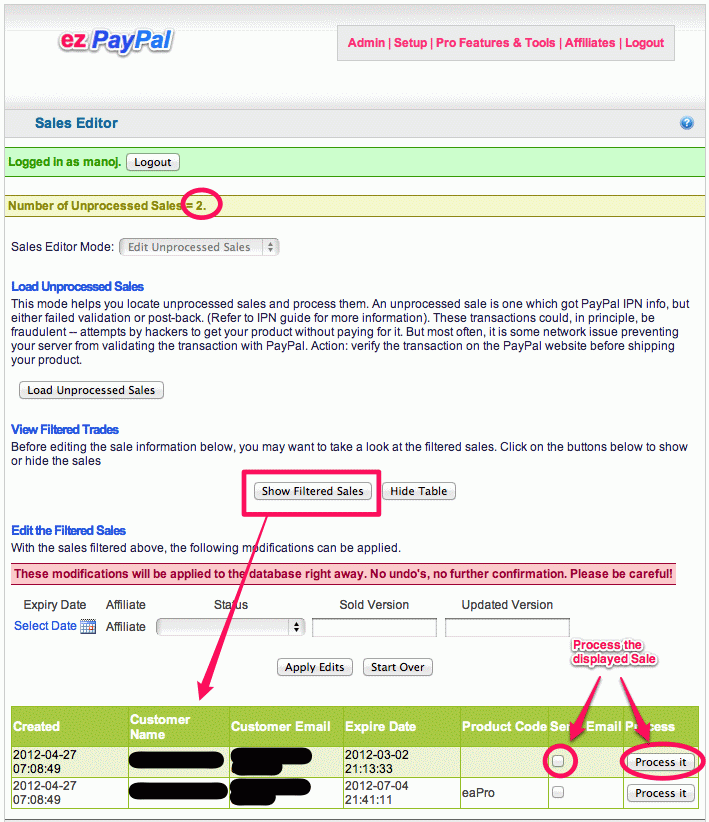
Email Tools
The Email Tools lets you keep in touch with your customers in a variety of ways. When you launch it from the Pro Control Panel, you are greeted with the following window.
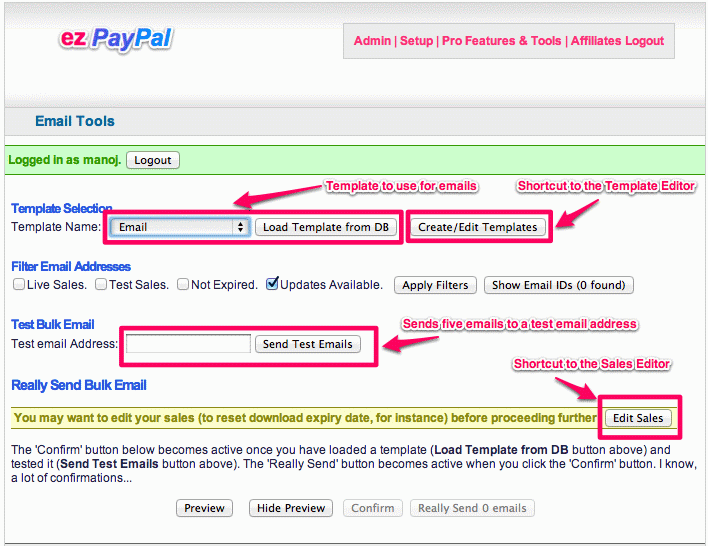
As you can see, this window is designed to be self-documenting, with generous help texts and tooltips to guide you along. For instance, once you filter a set of email addresses to send messages to, you get the following message about what kind of email templates you can use.

Migration Tools
Warning: This tool is meant for developers and system integrators. It requires editing the source code files and/or database manipulations.
The migration tools are sample scripts provided developers and integrators working on migrating data from an existing system to ezPayPal. These tools were originally developed for my own migration efforts. For a casual user with no existing data to migrate, they may be of limited use.
When you enter the migration tools window, you get four options, which are described below. As usual, there is ample tooltip help to guide you along.
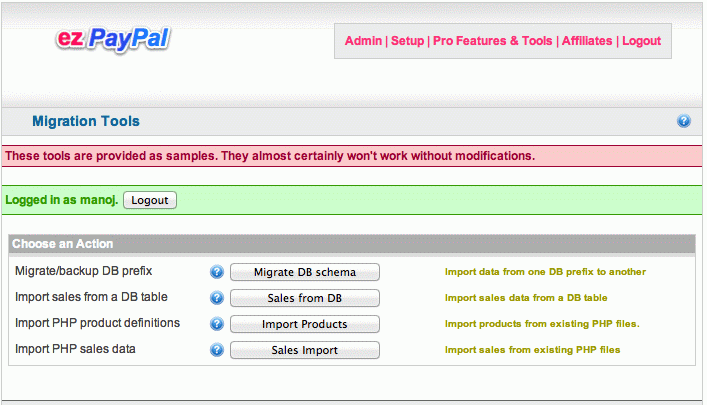
- Migrate/backup DB prefix: Use this tool to import data from a
database schema with a given prefix, say,
ezpp_to a new one, say,mine_. Using this tool, you can back up your existing data into another set of DB tables. This tool can also update your DB tables during a package version upgrade. - Import sales from a DB table: Use this tool to import sales
data from a database table, if you have sales data created by some other
package in a DB table. You will have to modify the file
migrate-ipnData.phpto match your table schema. - Import PHP product definitions: If your old products are
defined in PHP files, import them from the existing PHP files. You will
have to modify the file
migrate-products.php. [This tool is of limited use.] - Import PHP sales data: Import Sales info from existing PHP
files. If your sales data was written to individual PHP files, this tool
can import them into your database. You will have to modify the file
migrate-sales.php. [This tool is of limited use.]


Database Tools
This Pro tool helps you back and restore your database in a variety of formats.
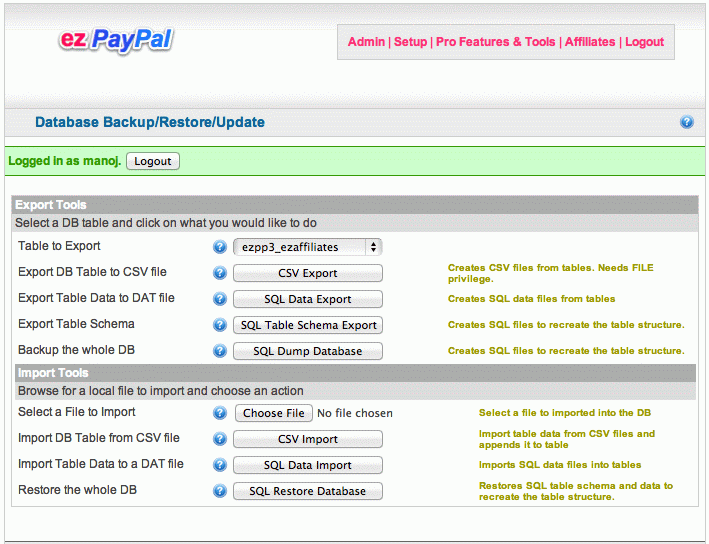
Export Options
- Export DB Table to CSV file: Exports the selected database table into a CSV file. You can view the files in Excel or any text editor. You will need FILE privilege on your database to do CSV export.
- Export Table Data to DAT file: Exports the selected database table into a data file. You can import the data back into the DB using the SQL import button below.
- Export Table Schema: Exports the selected database table into an SQL file. You can import the data back into the DB by executing it. Note that it creates only empty tables, not the data within.
- Backup the whole DB: Exports all the selected database tables (structure and data) into an SQL file. You can import the data back into this DB or another DB by executing it on phpMyAdmin or any other database program.
- Select a File to Import: Select a previously exported file. It can be a CSV, Data or SQL file exported using one of the buttons above
- Import DB Table from CSV file: Imports (and appends) the selected database table from a CSV file. You can modify the data in Excel or any text editor before importing. The file name should match the table name. Be careful about the primary keys and foreign key constraints.
- Import Table Data to a DAT file: Imports data to the selected database table from a data file. You can edit the data using a text editor before importing. Note that the data is appended to the database table, unless the primary key is violated.
- Restore the whole DB: You are not
expected use this option to update your DB. Use it only to restore data
to a test database.
Drops and imports all the selected database tables (structure and data) from an SQL dump file. You can also import the data back into this DB or another DB by executing it on phpMyAdmin or any other database program, hopefully to a non-production database.
Import Options
Security Audit
Check your ezPayPal for security vulnerabilities.
This tool is work-in-progress.
Chapter 6
Optional Modules
ezPayPal is designed to be extensible. The following optional extensions are ready and can be purchased either as an add-on module (if you already have the Standalone Pro version of ezPayPal or bundled with the Pro version at a discounted price.
Note that these extensions are designed to work with Standalone Pro version. They will be ported to the Plugin Pro version as well if possible.
- ezReports: Maximize your sales by analyzing your sales. This reporting package makes slicing and dicing your sales and affiliate data a snap, so that you can spot opportunities. If you already have the Standalone Pro version of ezPayPal, you can easily buy and add ezReports. [ Buy now]
- ezSubscribe: If you want to add subscription products (support contract, text links, newsletters etc), this module will make it a snap. If you already have the Standalone Pro version of ezPayPal, you can easily purchase and install ezSubscribe. [ Buy now]
- ezAffiliates: Create your own affiliate network and go viral by turing your satisfied customers into your advertising affiliatees. This package, built on the publicly available Affiliates-for-All, integrates perfectly with to automate affiliate sales tracking and commission computation and more. If you already have the Standalone Pro version of ezPayPal, you can buy ezAffiliates. [ Buy now]
- ezSupport: Every complex software project, once deployed, generates significant support load. Most of the support questions are frivilous, where the end-user presents silly issues that are easily resolved by a cursory look at the documentation. How do we ask the end-user to RTFM without antagonizing them? I found that it could be done by switching to a paid support model. I started charging 95 cents per support questions, and my support load went down by two orders of magnitude. This ezSupport package is built on the excellent osTicket program. It works hand in hand with ezPayPal and provides you with a configurable support system. If you already have the Standalone Pro version of ezPayPal, you can easily buy and install ezSupport. [ Buy now]
A few more optional modules for ezPayPal are in the pipeline:
- ezTextLinks: Do you have a high page-rank site? Do you get a lot of requests for text links? They can be significantly more lucrative (by a factor of 100, in my case) than contextual ads such as AdSense. The returns can be even greater if you can deal with your advertisers directly, rather than via providers like Text Link Ads that take 50% of your revenue. ezTextLinks will handle payment, activate and expire links, send reminder emails and handle renewals etc. The plugin version is already available as Easy Text Links in Lite and Pro
- Sell Your Pages: Sell your blog pages in PDF format to your readers so that they can get something in return for supporting you. [Optional Module -- Work in Progress].
EZ Reports
ezReports is a reporting engine for ezPayPal.
Description
ezReports is an add-on module for ezPayPal, which provides a reporting and charting engine. It can be installed on the standalone version of ezPayPal Pro. Used it in conjunction with ezPayPal, this modules enables you to analyze your sales and revenue data with the help of charts so that you can pinpoint revenue-generation opportunities.
If you would like to start your e-commerce website, you can purchase the full package of ezReports ready-to-use online for only $12.95.
Features
- Seamless integration with ezPayPal.
- Multiple reports provided.
- Easy to add new reports with the help and sample report provided.
Credits
ezReports uses Open Flash Chart to render beautiful charts.
Installation
Note: ezReports is an add-on module for ezPayPal Pro. You can install and use it only if you have ezPayPal. Or you can purchase the bundled package of ezReports and ezPayPal ready-to-deploy for a discounted price of only $12.95.
- On ezPayPal screen, click on Pro Functions.
- Log in if prompted.
- Click on the Reporting Engine button against the Track your sales and revenue entry.
- Click on the Install Package and follow the friendly wizard.
Frequently Asked Questions
Can I use this package without *ezPayPal*?
Not in the current form. A future version that can work independently of ezPayPal will be released soon.
How do I create a new report?
The ezReports module is written with extensibility in mind. With a bit of PHP knowledge, it is child's play to add another report. Follow these steps to make your own report.
- Make a copy of a look at the sample report
chart-product.phpin the module folder (ezPayPal/pro/ezreports). - Rename it to
chart-<something>.php. Let's say you call itchart-myreport.php. - Edit
chart-myreport.phpand change the report name near the top of the file (line 9 in the current version.) - In the data section (after
if
  (isset($_GET['data']))
), define your own data. - Save and upload the modified
chart-myreport.phpto your server, to the same location aschart-product.php. - Your report is ready and deployed, and will appear in the drop down menu when you start the reporting engine.
Visit Open Flash Chart to see available chart formats and code samples.
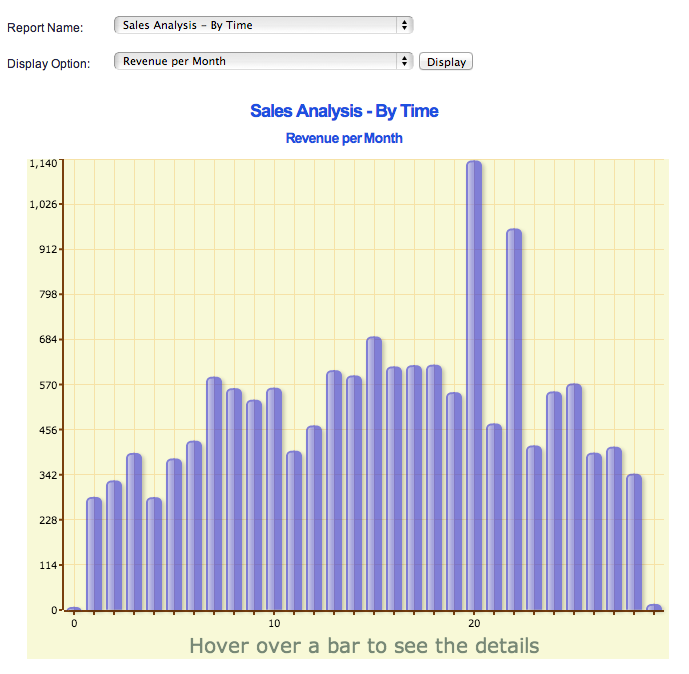
Screenshots
- Sample report - sales per product pie-chart.
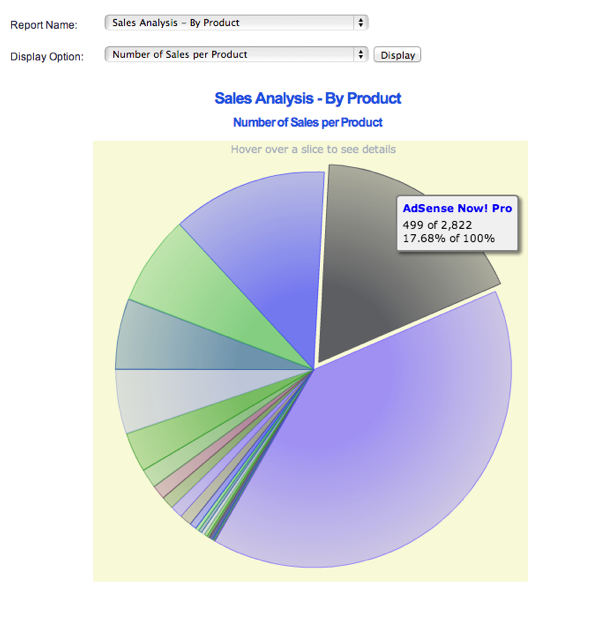
- Sample report - revenue per month.
Change Log
History
- V1.00: Initial release. [Nov 25, 2013]
Future Plans
- Provide more reports.
Changelog
History
- V1.00: Initial release. [Nov 25, 2013]
Future Plans
- Provide more reports.
EZ Subscribe
ezSubscribe is a subscription module for ezPayPal.
Description
ezSubscribe is subscription module for ezPayPal, which can be purchased online. Used it in conjunction with ezPayPal, this modules enables you to define and sell subscription-based products and services (newsletters, support contracts, advertising contracts or even one time subscriptions like installation or customization service) on your website.
If you would like to start your own subscription system, you can purchase the full package of ezSubscribe ready-to-use online for only $12.95.
Features
- Seamless integration with ezPayPal.
- Multiple Configurable products and services.
- Automatic handling of subscription start, end, modification etc.
Installation
Note: ezSubscribe is an add-on module for ezPayPal Pro. You can install and use it only if you have ezPayPal. Or you can purchase the bundled package of ezSubscribe and ezPayPal ready-to-deploy for a discounted price of only $12.95.
- On ezPayPal screen, click on Pro Functions.
- Log in if prompted.
- Click on the Subscription Package button against the Subscription System entry.
- Click on the Install Package and follow the friendly wizard.
Frequently Asked Questions
Can I use this package without *ezPayPal*?
Not in the current form. A future version that can work independently of ezPayPal will be released soon.
Why would I want to charge my users for support?
Not to get rich, for sure! In my case, I have a few popuplar plugins and packages out there on the net. My users kept sending me emails with questions that are clearly answered in the FAQ, documentation etc. When I got tired of cutting and pasting the FAQ answers, I decided to charge them a small amount ($0.95) per question. In fact, I didn't really charge them, I just told them that I would. And, to my surprise, my support load went down by over 90%! I wanted to use a support ticket system, but was worried that it would swamp me with frivilous tickets. A subscription model made sense in my case. Besides, it will certainly cut down on spam.
Why do the email messages from ezSubscribe end up in Spam/Junk mail boxes?
Depending on how your PHP installation is configured, your emails may
look like spam to some of the mail sentinel out there. The safest way to
overcome this is to set up SMTP for outgoing mail. Logon to your
ezSubscribe Admin panel (<your ezSubscribe
site>/scp/admin.php) and click on the Emails tab. Click on the
"Subscribe" email (typically support@yoursite.com) and enter
the values in the "SMTP Settings (Optional)" and section. You
will also need to enter your login info in the "Login info
(optional)" subsection.
Screenshots
- Installation integration from ezPayPal Pro Screen.
Change Log
Future Plans
- Design and implement a subscription model.
History
- V1.11: Fixing another bug that caused the subscription page to be hidden. [Nov 26, 2013]
- V1.10: Various bug fixes after testing for use with WP-Plus.org. [Sep 2, 2013]
- V1.01: Releasing ezSubscribe bundled with ezPayPal. [Sep 30, 2012]
- V1.00: Initial release. [Sep 12, 2012]
Changelog
Future Plans
- Design and implement a subscription model.
History
- V1.11: Fixing another bug that caused the subscription page to be hidden. [Nov 26, 2013]
- V1.10: Various bug fixes after testing for use with WP-Plus.org. [Sep 2, 2013]
- V1.01: Releasing ezSubscribe bundled with ezPayPal. [Sep 30, 2012]
- V1.00: Initial release. [Sep 12, 2012]
EZ Affiliate
ezAffiliates is an affiliate marketing module for ezPayPal.
Description
ezAffiliates is an affiliate marketing module for ezPayPal, which can be purchased online. Using it in ocnjunction with ezPayPal, you can turn your satisfied customers into your brand ambassidors, and get one step closer to that internet dream of going viral.
Features
- Seamless integration with ezPayPal.
- Email verification of affiliate registration to prevent bots.
- Cookie-less scheme to track sales through PayPal IPN process.
Credit
ezAffiliates is a modifed version of Affiliates for All. Please refer to their extensive documentation for details.
For our purpose, we have made the following changes and additions:
- Tight integration with ezPayPal
- Email verification and activation of affiliate registration to prevent bots.
- Admin account securitization.
- Terms of Service page.
- Modifications to the overview and index pages to help the affiliates generate links
- Database storage for admin customization so that ezPayPal can be installed and configured from a web interface without editing any files.
- ezPayPal look and feel modifications.
- Cookie handling modifications for it to work with PayPal IPN round trip.
- Banner serving can use a CDN since everybody can have a free CDN with Dropbox or a reasonably cheap one from Amazon CloudFront (preferred).
Upgrade Notice
Adding a CDN option so that affiliate banners will be served from the CDN instead of the database.
Screenshots
- Installation integration from ezPayPal.
- Log on screen.
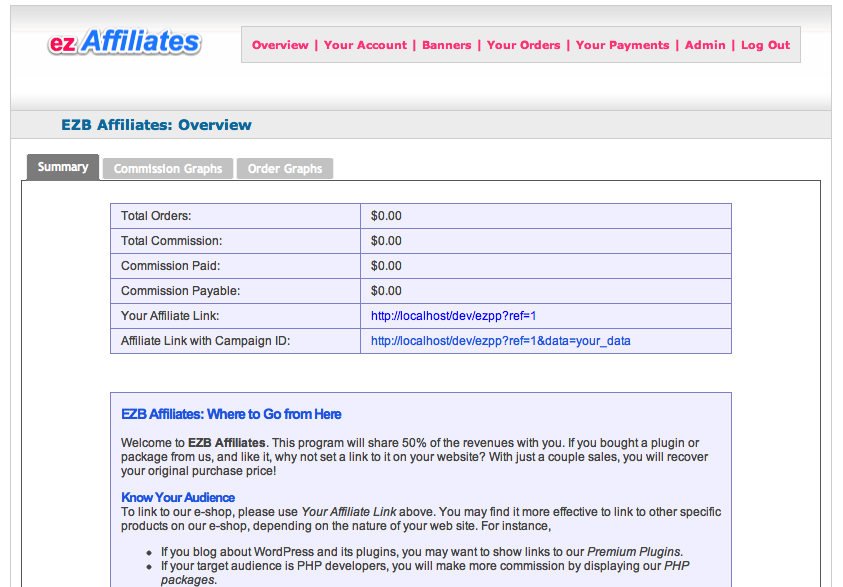
- Overview screen after logging on.
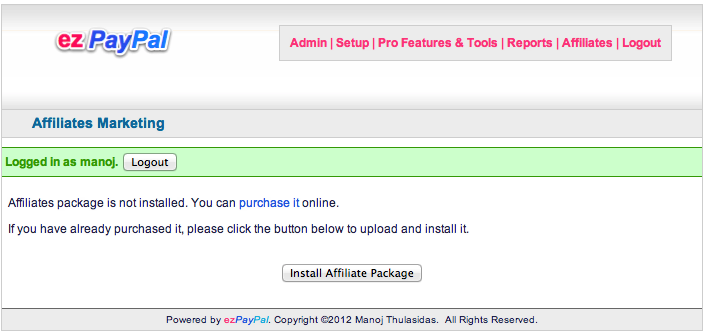
Installation
Note: ezAffiliates is an add-on module for ezPayPal Pro. You can install and use it only if you have ezPayPal.
- On ezPayPal screen, click on Pro Features & Tools.
- Log in if prompted.
- Click on Affiliate Package button.
- Click on the Install Affiliate Package and follow the friendly wizard.
Frequently Asked Questions
Can I use this package without ezPayPal?
Not in the current form. A future version that can work independently of ezPayPal will be released soon.
Change Log
Future Plans
- Improve documentation.
History
- V1.21: Adding a CDN option so that affiliate banners will be served from the CDN instead of the database. [July 8, 2012]
- V1.20: Adding a banner grouping feature. Banners can be chosen by size using a drop-down menu. [July 7, 2012]
- V1.12: Moving some static files to my Cloudfront CDN. [June 17.2012]
- V1.11: Adding changes to the overview page. [May 22, 2012]
- V1.10: Ready to cut over on buy.thulasidas.com, with affiliate support. [May 19, 2012]
- V1.00: Initial release. [May 12, 2012]
Configuration
- Affiliate Programme Name: Set this to the name of your affiliate programme. It will be shown at the top of all the screens used by affiliate.
- Affiliate Base URL: Set this to the URL of your affiliate program. This is where your affiliates log on to. If you have a domain or subdomain for it, you may want to enter it here instead of the default value.
- Affiliate Referrer Parameter: his parameter is used in affiliate links, and contains the affiliate number. For example, a link might look like http://...?ref=123 for affiliate 123.
- Affiliate Data Parameter: This parameter is also used in affiliate links, and carries the custom data from the affiliate. For example, it might contain the user search keywords, to allow for optimisation of a PPC campaign.
- Affiliate Cookie: The name of the cookie which stores the referring affiliate.
- Cookie Lifetime: The lifetime of the cookie in days.
- Cookie Domain: The hostname for which the affiliate cookie
should be set. You should leave this unchanged unless your checkout is
on a different domain to your store. For example, if you have
http://www.example.com
for your store andhttps://secure.example.com
for your checkout, you should setcookie_domainto example.com. Note thatezAffiliateswill not work at all if the store and cart are on completely different domains. For example, you might have
http://www.example.com
for your store, and
https://example.secureserver.com
for your checkout. This configuration will not work. - Currency Symbol: The currency symbol as it will appear on your affiliate reports.
- Currency Code: Specify the currency SWIFT code. e.g. USD.
- The URL to your E-Shop: This should be set to the base of your shop.
- Commission Percent: You can give a fixed amount of commission per order, or you can give a percentage. If you give both, they add. Set these variables to the percentage rate and the fixed amount which you want to pay to your affiliates.
- Commission Fixed: You can give a fixed amount of commission per order, or you can give a percentage. If you give both, they add. Set these variables to the percentage rate and the fixed amount which you want to pay to your affiliates.
- Lifetime Revenue Share: If you want affiliates to share revenue for all the orders their customers place, set the following to TRUE. If you only want them to receive revenue share when customers have an affiliate cookie set on their browsers, set it to FALSE. For example, suppose an affiliate introduces customer X. X places an order and the affiliate receives commission. After that, X changes browser, meaning that he no longer has an affiliate cookie set. He then places another order. If this variable is TRUE, the affiliate receives commission on this order too (provided X uses the same account of course). If this variable is FALSE, he does not.
- Notification Email Address: If you want to be notified when ezAffiliates accepts an order, or marks an order shipped, enter an email address here
- Administrator Email Address: The following address is used as the sender for these email notifications, and also for email notifications sent to affiliates
- Order Fields Available: Affiliates can be given full or restricted information about the referred customers and their orders. The fields you want to reveal should be placed in this list
- Order Fields Headings: Affiliates can be given full or restricted information about the referred customers and their orders. The fields you want to reveal should be placed in this list
- Random RPC Secret?: RPC secret is used to secure communications between the shopping cart and the affiliate system. Setup can create a random string for you. Click on the Show button to see the random string. RPC Secret: The following secret is used to secure communications between the shopping cart and the affiliate system. Just choose something that will be hard to guess.
- Reuse ezPayPal DB credentials?: Leave this option checked to use the same database credentials as ezPayPal. You do not need to fill in the next three options then.
- Database DSN: Fill in the settings for your database below.
Note that all testing has been carried out on MySQL 5.0. Specify the DSN
in the format:
mysql:dbname=blah-blah;host=blah-blah. Thehostpart is usuallylocalhost. - Database Username: The username for your database. In most installations, they use the username the same as (or derived from) the database.
- Database Password: Specify your database access password.
- Session Cookie Name: This is the name of the cookie which is used for ezAffiliate sessions. (It is set for affiliates and administrators, but not customers of your web shop.) If you run two instances of ezAffiliates on the same domain, you should change it for at least one of them, as otherwise they could interfere with each other.
- Time Zone
- Terms of Business: Affiliates will be asked to agree to the following terms of business
- Affiliate Help: Help text to be shown to the affiliates on
the overview screen. Describe your affiliate program here, and give
helpful hints.
The default entry given here is specific to our e-shop. You must edit it to suit your purposes.
EZ Support
ezSupport is a paid support module for ezPayPal.
Contributors: manojtd
Donate link: http://buy.thulasidas.com/ezsupport
Tags:
Requires at least:
Tested up to:
Stable tag: 1.10
License:
Description
ezSupport is paid support ticket module for ezPayPal, which can be purchased online. Using it in conjunction with ezPayPal, you can request that a fee be paid for every support ticket you get for your products.
If you would like to start your own paid support ticket system, you can purchase the full package of ezSupport ready-to-use online for only $12.95.
Features
- Seamless integration with ezPayPal.
- Configurable pricing for your support.
- Configurable auto-closing of support tickets.
Credit
ezSupport is a modifed version of osTickets. Please refer to their wiki pages for details.
For our purpose, we have made the following changes and additions:
- Tight integration with ezPayPal
- Database storage for admin customization so that ezSupport can be installed and configured from a web interface without editing or setting permissions to any files.
- ezPayPal look and feel modifications.
- Ticket validation check to ensure that the payment has been made, and hasn't expired.
- HTML Mail support.
- Secure access to install.php and upgrade.php scripts using ezPayPal logon.
- Auto-creation of help topics based on ezPayPal products.
- Free support for purchases from the ezPayPal store during the download grace period.
Installation
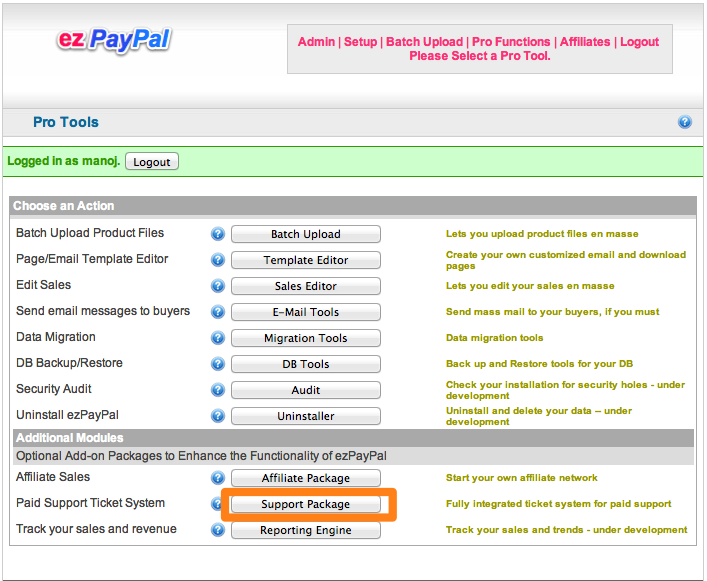
Note: ezSupport is an add-on module for ezPayPal Pro. You can install and use it only if you have ezPayPal. Or you can purchase the bundled package of ezSupport and ezPayPal ready-to-deploy for a discounted price of only $12.95.
- On ezPayPal screen, click on Pro Functions.
- Log in if prompted.
- Click on the Support Package button against the Paid Support Ticket System entry.
- Click on the Install Package and follow the friendly wizard.
Frequently Asked Questions
Can I use this package without *ezPayPal*?
Not in the current form. A future version that can work independently of ezPayPal will be released soon.
Why would I want to charge my users for support?
Not to get rich, for sure! In my case, I have a few popuplar plugins and packages out there on the net. My users kept sending me emails with questions that are clearly answered in the FAQ, documentation etc. When I got tired of cutting and pasting the FAQ answers, I decided to charge them a small amount ($0.95) per question. In fact, I didn't really charge them, I just told them that I would. And, to my surprise, my support load went down by over 90%! I wanted to use a support ticket system, but was worried that it would swamp me with frivilous tickets. A paid support model made sense in my case. Besides, it will certainly cut down on spam.
Why do the email messages from ezSupport end up in Spam/Junk mail boxes?
Depending on how your PHP installation is configured, your emails may
look like spam to some of the mail sentinel out there. The safest way to
overcome this is to set up SMTP for outgoing mail. Logon to your ezSupport
Admin panel (<your ezSupport site>/scp/admin.php) and
click on the Emails tab. Click on the "Support" email (typically
support@yoursite.com) and enter
the values in the "SMTP Settings (Optional)" and section. You
will also need to enter your login info in the "Login info
(optional)" subsection.
Screenshots
- Installation integration from ezPayPal Pro Screen.
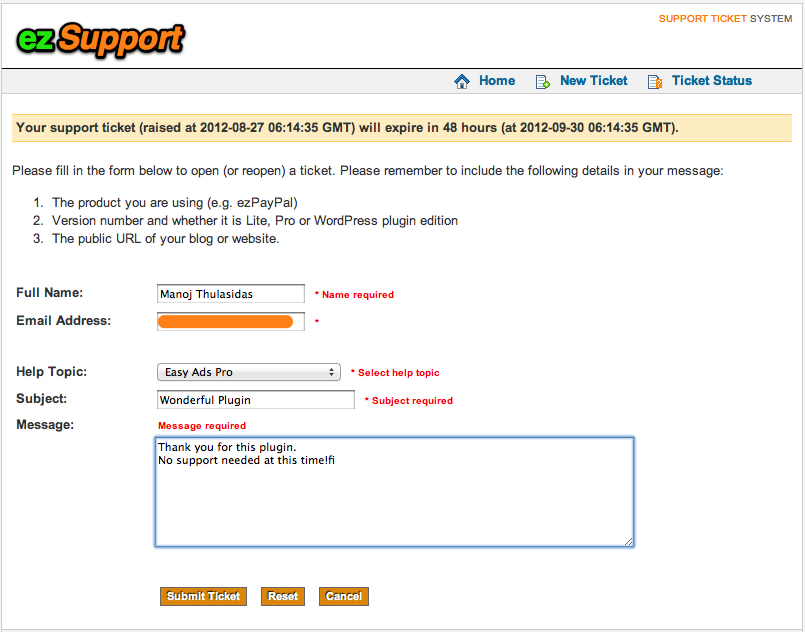
- Log on screen.
- Support Ticket page.
Change Log
Future Plans
- Design and implement a subscription model.
History
- V1.10: Changes to make it compatible with the new version of DbHelper. [Nov 18, 2013]
- V1.02: Adding support for passing email as a GET parameter to open.php. [Oct 13, 2012]
- V1.01: Releasing ezSupport bundled with ezPayPal. [Sep 30, 2012]
- V1.00: Initial release. [Sep 12, 2012]
Changelog
Future Plans
- Design and implement a subscription model.
History
- V1.10: Changes to make it compatible with the new version of DbHelper. [Nov 18, 2013]
- V1.02: Adding support for passing email as a GET parameter to open.php. [Oct 13, 2012]
- V1.01: Releasing ezSupport bundled with ezPayPal. [Sep 30, 2012]
- V1.00: Initial release. [Sep 12, 2012]
EZ Text Links
Sell text links on your website powered by ezPayPal.
This module is not ready as an EzPayPal module yet. However, we have a WordPress plugin version that works in conjunction with Easy PayPal. It is described below.
Easy Text Links
A robust and modern plugin to help you sell and manage text links on your blog.
Contributors: manojtd
Donate link:
http://buy.thulasidas.com/easy-text-links
Tags: text links, advertising, revenue, ezlinks, easy
text links
Requires at least: 3.5
Tested up to: 3.7
Stable tag: 1.61
License: GPLv2 or later
Description
Easy Text Links is a modern plugin to help you make extra revenue from your blog by selling text links. Text link advertising can be significantly more lucrative than contextual ads. This plugin automates the insertion and expiration of the links, and helps you with quick reminder emails to your advertisers.
Other plugins that do similar text link advertising do exist in the repository, but they are typically front ends to services that provide such links (such as Text Link Ads, for instance.) They take a significant cut of your advertising revenue (50% in the case of Text Link Ads) acting as the middlemen between you and your advertisers. Easy Text Links, on the other hand, is for those who want to interact directly with their advertisers, and keep the whole revenue for themselves, cutting the middlemen.
Easy Text Links keeps track of the expiry dates of the text links on your page, and removes them when expired. It also gives you easy means of sending a reminder email to the advertiser, block or delete the links all from your blog page itself, without having to go to the admin page. Of course, it is smart and secure so that only the blog admin with the right privileges will ever see the options to modify the links. It does all this magic using a modern AJAX/jQuery framework with an attractive lightbox effect.
If you have a popular blog, text links can potentially bring in much more revenue than any contextual advertising. In my case, the difference was easily a factor of 100. Keep in mind, however, that most contextual ad providers (such as AdSense) do not like paid link placement, for obvious reasons. Your blog may get penalized in terms page rank or search listing placement. Please weigh the pros and cons carefully before embarking on text link advertising. If you do decide to go for it, this plugin will be able to help.
Features
- Automatic removal of your text links upon expiry.
- Ability to send a reminder email to your advertiser with one click.
- Ability to delete and block your links and modify their expiries.
- Convenience of managing your links (delete, block, set expiry, email advertiser etc.) right from your blog post where the link appears, without going to the plugin admin page.
- Attractive and modern interface with lightbox effect.
- Highly secure and robust against potential hacker attacks and attempts to manipulate links.
- Now available in your own language using machine translation curtsey of Google and Microsoft.
Pro Version
A pro version of this plugin is available with the following added features:
- Fully automated link sales and expiry (with the help of the Easy PayPal plugin available at WordPress.
- Your advertisers will see "Buy Now" buttons to purchase links.
- Basic widget support.
- Automatic email reminders to you and your advertiser when the links are about to expire. (WIP)
- Choice of several attractive "Advertise Here" images. (WIP)
- Advanced widget support with a dedicated widget. (WIP)
Installation
You can install it using the WordPress Plugins -> Add New interface.
Or,
- Upload the Easy Text Links plugin (the whole
easy-text-linkfolder) to the '/wp-content/plugins/' directory. - Activate the plugin through the 'Plugins' menu in your blog.
To use the plugin, insert the shortcode [ezlink] in a
post. See the FAQ for more information.
Frequently Asked Questions
What are "Link Packages" and "Sold Links"?
Link Packages describe what you offer to your advertisers. They specify
your rates and other relevant information to entice advertisers to divert
some of the marketing budget in the direction of your blog. For instance,
you may have these packages: (1) "AboveFold" with Price=$100,
Expiry=720 (which is a month in hours) (2) "AboveFold (3mo)"
with Price=$250, Expiry=2160 (three months in hours) (3)
"Footer" with Price=$50, Expiry=720 and so on. You can list them
wherever you want by giving the shortcode [ezlink packages].
You will also see all your packages listed on the Easy Text Links
admin page in a neat table, where you can inspect, modify or delete
them.
Sold Links are, naturally, the links you have sold to your advertisers.
You can display them on your posts or pages by the shortcode [ezlink
links]. If you want to display only a particular link (whose ID is,
say, link1), you would give the shortcode [ezlink
links=link1]. For multiple links, you give the shortcode as
[ezlink links=link1,link2]. Again, the sold links will appear
on the plugin admin page where you can manipulate them.
The links and products, when listed using the shortcode
[ezlink], will be formatted as an unordered list
(<ul>...</ul>).
I don't want the links to be an unordered list. What can I do?
You can specify an option in the shortcode as [ezlink
option=nolist]. This option can be given with any combination of
[ezlink packages], [ezlink packages] or
[ezlink links=link1,link2,link3...].
How do I specify a "Advertise Here" link pointing to a blog page?
You insert the shortcode [ezlink invite] (or [ezlink
advertise] or [ezlink here]) to display such an
invitation.
Note that you have to create the target page/post with a title like
"Advertise Here" or something similar and point to it on the
plugin admin page (under the "Advertise Here" Target:
option). Once that is done, your [ezlink invite] shortcode
will point to that page/post. In that page, you can use [ezlink
packages] shortcode to list your link packages, and give any
contact details so that your advertisers can get in touch with you.
Can I have a full list of shortcode keywords and syntax?
- List packages (within
<ul>...</ul>) :[ezlink packages]. - List all links (within
<ul>...</ul>) :[ezlink links] - List specific links (within
<ul>...</ul>) :[ezlink links=link1,link2,link3...]. - Suppress
<ul><li>...</li></ul>around any of the lists above :[ezlink option=nolist ...] - Advertise Here display :
[ezlink invite]or[ezlink advertise]or[ezlink here]
How can I get the links or packages in a widget?
The Pro version version of Easy Text Links gives you basic support for widgets. You can use the WordPress default Text widget to insert the shortcode and it will be rendered as expected. A dedicated and multi-insertable widget with fully configurable text links will be released later.
The lite version does not offer a widget. The work around is to install
the Shortcode Widget.
You can then place the [ezlink] shortcodes in the widgets
provided by Shortcode Widget.
I deleted/blocked a link by mistake. Now it has disappeared. How do I get it back?
Go to the admin page of the plugin, and edit the Sold Link by clicking on the edit icon (green pencil) on the floating toolbar. You can then set the status to anything other than Deleted or Hidden.
I added a link. But it doesn't show up. What's wrong?
Note that in the Pro version, you have to Approve the links before they will be displayed. This is in preparation to letting your advertisers specify link details after purchasing. You probably don't want to allow such user specified content to appear on your blog without checking. If you do, you will find an option (WIP) to allow it.
Screenshots
-
Links inserted by Easy Links Pro. Note the floating tool bar that appears when you hover over the link (if you are logged in as the admin to your blog) giving you easy access to the actions you can take.
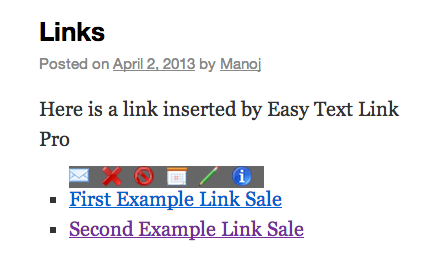
-
The Admin Page. The tool bar appears as you hover over a row in the Links Packages or Sold Links table.
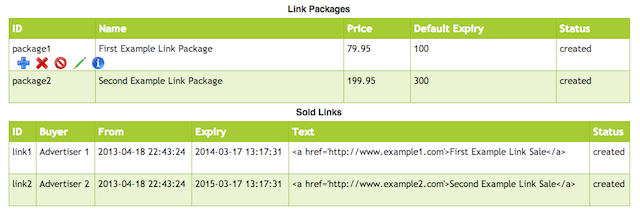
Change Log
- V1.61: Bug fix related to hidden admin page. [Nov 12, 2013]
- V1.60: Compatibility with WP3.7. [Nov 7, 2013]
- V1.51: Adding integration with stand-alone EzPayPal. [Nov 6, 2013]
- V1.50: Compatibility with WP3.6. [Aug 8, 2013]
- V1.42: Preparing automated link sales. Links need to be approved now before they appear on your blog. [Jul 9, 2013]
- V1.41: Bug fix in Easy PayPal integration. [May 20, 2013]
- V1.40: Introducing internationalization using Google/Microsoft Translate Widgets. [May 17, 2013]
- V1.34: Bug fix on displaying the link toolbar. Documentation and help changes. [May 15, 2013]
- V1.33: Adding basic text widget support. [May 14, 2013]
- V1.32: Fixing the plugin updater module. [May 13, 2013]
- V1.31: Link package expiry defaults to the Easy PayPal expiry, and the edited value is sticky. [May 12, 2013]
- V1.30: Initial release of the Pro version. [May 8, 2013]
- V1.20: Handling empty attributes in shortcode, and hidden and deleted packages. [May 3, 2013]
- V1.11: Minor bug fix. [May 2, 2013]
- V1.10: Correcting W3C markup validation errors on the admin page. [May 1, 2013]
- V1.01: Handling blocked and deleted links. [Apr 23, 2013]
- V1.00: Initial release. [Apr 20, 2012]
Future Plans
- Templating package listing and "Advertise Here" page and link.
- More fields in templates (BUYER, PACKAGENAME etc.)
- Making package and link expiry specification flexible (today, tomorrow, +-nd/w/m/y)
- Widget support (Pro version).
- Integration with Easy PayPal (Pro version).
- Use JSON in AJAX-jQuery communication for standard compliance.
- Style the admin tables to match WordPress admin themes.
- Internationalization.
Changelog
- V1.61: Bug fix related to hidden admin page. [Nov 12, 2013]
- V1.60: Compatibility with WP3.7. [Nov 7, 2013]
- V1.51: Adding integration with stand-alone EzPayPal. [Nov 6, 2013]
- V1.50: Compatibility with WP3.6. [Aug 8, 2013]
- V1.42: Preparing automated link sales. Links need to be approved now before they appear on your blog. [Jul 9, 2013]
- V1.41: Bug fix in Easy PayPal integration. [May 20, 2013]
- V1.40: Introducing internationalization using Google/Microsoft Translate Widgets. [May 17, 2013]
- V1.34: Bug fix on displaying the link toolbar. Documentation and help changes. [May 15, 2013]
- V1.33: Adding basic text widget support. [May 14, 2013]
- V1.32: Fixing the plugin updater module. [May 13, 2013]
- V1.31: Link package expiry defaults to the Easy PayPal expiry, and the edited value is sticky. [May 12, 2013]
- V1.30: Initial release of the Pro version. [May 8, 2013]
- V1.20: Handling empty attributes in shortcode, and hidden and deleted packages. [May 3, 2013]
- V1.11: Minor bug fix. [May 2, 2013]
- V1.10: Correcting W3C markup validation errors on the admin page. [May 1, 2013]
- V1.01: Handling blocked and deleted links. [Apr 23, 2013]
- V1.00: Initial release. [Apr 20, 2012]
Future Plans
- Templating package listing and "Advertise Here" page and link.
- More fields in templates (BUYER, PACKAGENAME etc.)
- Making package and link expiry specification flexible (today, tomorrow, +-nd/w/m/y)
- Widget support (Pro version).
- Integration with Easy PayPal (Pro version).
- Use JSON in AJAX-jQuery communication for standard compliance.
- Style the admin tables to match WordPress admin themes.
- Internationalization.
Page Seller
Sell your blog pages in printable PDF format so that your faithful readers can show their appreciation. Powered by ezPayPal.
This module is not ready for sale yet.